环境: 189.118----->elk01 安装es kibana filebeat filebeat 安装参考前面文档 ++++++++++ 官方文档: https://www.elastic.co/guide/en/beats/filebeat/6.6/configuration-filebeat-modules.html [root@elk01 modules.d]# filebeat modules list ##查看模块列表 Error in modules manager: modules management requires 'filebeat.config.modules.path' setting filebeat配置文件配置模块路径: 修改filebeat 配置文件: vim /etc/filebeat/filebeat.yml filebeat.config.modules: path: ${path.config}/modules.d/*.yml reload.enabled: true reload.period: 10s setup.kibana: host: "192.168.189.118:5601" ############ output output.elasticsearch: hosts: ["192.168.189.118:9200"] indices: - index: "nginx-module-%{[beat.version]}-%{+yyyy.MM}" setup.template.name: "nginx" setup.template.parttern: "nginx-*" setup.template.enabled: false setup.template.overwrite: true 保存,退出,先不用重启filebeat 。 再次执行 filebeat modules list激活模块: cd /etc/filebeat/modules.d ##filebeat 模块目录
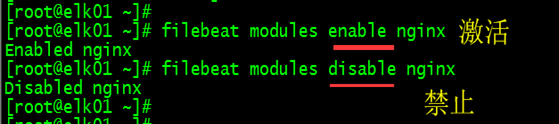
filebeat modules enable nginx

修改模块配置文件: 用它的作用是,不想去更改nginx 日志文件类型,保持默认。 修改nginx 日志为普通模式 先将nginx 的日志,更改为原来的默认类型。 vim /etc/nginx/nginx.conf
nginx -t nginx -s reload >/var/log/nginx/access.log ##清空日志 curl http://192.168.189.118
nginx 日志,已经恢复成了,默认的日志格式了。 ab 压力测试,模拟一些日志数据。 ab -n 10 -c 10 http://192.168.189.118/www.html +++++++++++ 修改nginx的模版文件: cd /etc/filebeat/modules.d vim nginx.yml
保存,退出。重启filebeat systemctl restart filebeat tail -f /var/log/filebeat/filebeat
2020-10-07T14:14:07.123+0800 ERROR fileset/factory.go:142 Error loading pipeline: Error loading pipeline for fileset nginx/access: This module requires the following Elasticsearch plugins: ingest-user-agent, ingest-geoip. You can install them by running the following commands on all the Elasticsearch nodes: sudo bin/elasticsearch-plugin install ingest-user-agent sudo bin/elasticsearch-plugin install ingest-geoip 意思是缺少这两个插件: ingest-user-agent:浏览器访问类型 ingest-geoip:分析IP地址的一个数据库 那么这个elasticsearch-plugin 在那? [root@elk01 modules.d]# find / -name "elasticsearch-plugin" /usr/share/elasticsearch/bin/elasticsearch-plugin 直接运行: /usr/share/elasticsearch/bin/elasticsearch-plugin install ingest-user-agent
/usr/share/elasticsearch/bin/elasticsearch-plugin install ingest-geoip #这一步会比较慢,还有可能装不上,因为它默认从官网下载,可以提前下载然后离线安装
+++++++++++ 离线下载安装: wget https://artifacts.elastic.co/downloads/elasticsearch-plugins/ingest-user-agent/ingest-user-agent-6.6.0.zip wget https://artifacts.elastic.co/downloads/elasticsearch-plugins/ingest-geoip/ingest-geoip-6.6.0.zip 或者 wget http://www.xchinagroup.top/softdown/centos7/13_elk/ingest-geoip-6.6.0.zip wget http://www.xchinagroup.top/softdown/centos7/13_elk/ingest-user-agent-6.6.0.zip cd /usr/share/elasticsearch/bin ./elasticsearch-plugin install file:///root/ingest-user-agent-6.6.0.zip ./elasticsearch-plugin install file:///root/ingest-geoip-6.6.0.zip
++++++++++++++++ 注意:6.7之后这两个插件默认集成到了elasticsearch,不需要单独安装了 重启elasticsearch 重启filebeat ab -n 5 -c 5 http://192.168.189.118/rxj/www.html ES查看数据:
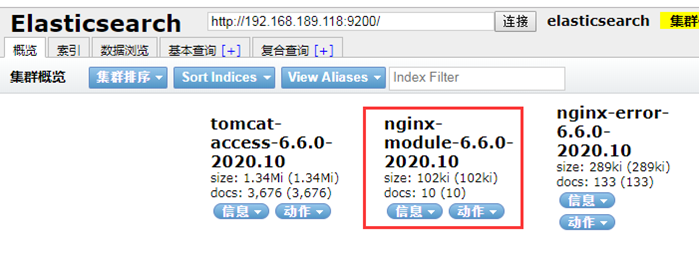
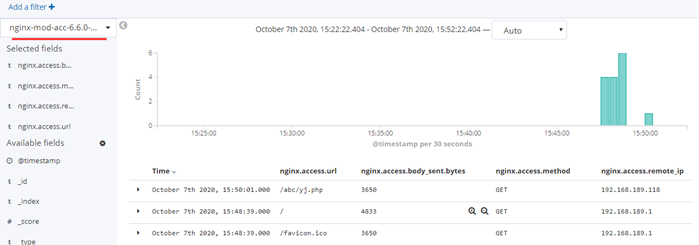
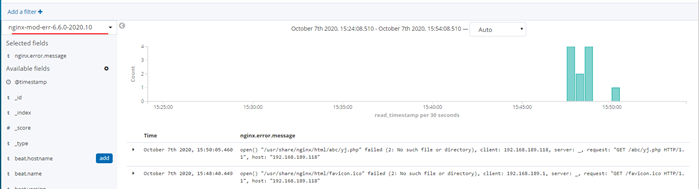
这时我们发现,nginx 的access日志和error日志都是在同一个索引中,但是我们可以通过fileset.name的值,将其分开存储。 vim /etc/filebeat/filebeat.yml filebeat.config.modules: path: ${path.config}/modules.d/*.yml reload.enabled: true reload.period: 10s setup.kibana: host: "192.168.189.118:5601" ############ output output.elasticsearch: hosts: ["192.168.189.118:9200"] indices: - index: "nginx-mod-acc-%{[beat.version]}-%{+yyyy.MM}" when.contains: fileset.name: "access" - index: "nginx-mod-err-%{[beat.version]}-%{+yyyy.MM}" when.contains: fileset.name: "error" setup.template.name: "nginx" setup.template.parttern: "nginx-*" setup.template.enabled: false setup.template.overwrite: true 保存退出,重启filebeat 。并模拟nginx 访问日志数据 ES中查看,索引是否有被创建。
Kibana中添加索引数据: ++++++

创建nginx-mod-acc-6.6.0-2020.10 索引时,还是选择@timestamp